Cabinet Refinishing – A Quick and Easy Way to Upgrade Your Kitchen Cabinets

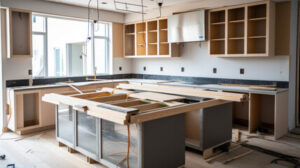
Cabinet Refinishing Modesto Anchor is a way to upgrade your kitchen without ripping out existing cabinetry. It typically involves staining or painting cabinetry.

Cabinet Refinishing

The process requires careful paint application and often includes several coats, sanding between each. It can also include cleaning using chemical products like trisodium phosphate (TSP) and soap and water.

Whether your cabinets are worn, outdated, or simply in need of a facelift, refinishing them is an economical and environmentally responsible option. Unlike cabinet refacing, refinishing can be completed in a shorter time frame, typically within a week or two. The process involves using paint or stain to refresh the existing cabinets’ appearance. The goal is to create a look that is customized and modern. This may include changing the color from light to dark, or a light color to a darker shade. Cabinet refinishing can also be used to repair or cover scratches, dents and fading.

The first step in the refinishing process is to clean all surfaces of your cabinets. This is a critical step that is often skipped by many contractors, but is very important for long-lasting results. This is because dirt acts like a barrier, preventing the product from properly adhering to the surface. Cleaning the cabinets will also ensure that any old stain or paint is removed, allowing for a smooth, even finish.

After cleaning, the surfaces should be sanded to provide a smooth base for new coatings. This should be done with medium-grit sandpaper, and the surfaces should be wiped down again to remove any dust.

Next, you’ll want to apply a coat of primer, and allow it to dry completely. It’s important to choose a high-quality primer, such as Zinnser Oil-Based Primer, to prevent the new finish from chipping or peeling prematurely. Once the primer is dry, you can begin the sanding and painting process.

It’s a good idea to use plastic sheeting and drop cloths to protect your floors, walls, and countertops from any paint or stain spills. Stains and paints contain volatile organic compounds that can irritate the skin, eyes, nose, and throat. You’ll also need to wear personal protective gear and have adequate ventilation when working with these products.

When refinishing cabinets, it is important to note that the original doors aren’t usually made from solid wood. The gable ends, cabinet boxes, and styles were more frequently constructed of real hardwood, but many manufacturers now use cheap veneers to save money. This type of material is not as durable, and it can easily warp or swell from exposure to water.

Primer

The right primer preps the cabinet surfaces and creates a strong base for paint. Primers are “sticky” and specially formulated to adhere well to the surface they’re painted on, which helps the new coat of paint stay put. They also fill in tiny imperfections, creating a flawless canvas that resists chipping and fading.

Whether you’re painting cabinets to freshen the look or for a total makeover, the proper application of primer will ensure your project goes as planned and looks great. Many DIYers skimp on this step, but it’s essential for a beautiful finish that holds up to daily wear and tear and moisture.

Before you can apply the first coat of primer, clean the cabinets with a degreaser solution or trisodium phosphate (TSP). These stronger cleaners are available at hardware stores and paint supply shops and require special protective gear and ventilation.

A good quality primer will hide stains, unwanted odors, water and fire damage, tanning, and knots in the wood. If your cabinets are heavily stained, choose a stain-blocking primer to seal the existing color and prevent it from bleeding through the topcoat. For most refinishing projects, however, an adhesion primer should work fine.

Oil-based primers offer the best durability, but they produce noxious fumes and need to be used in well-ventilated areas with appropriate respirator protection. A water-based primer such as KILZ 3 Premium Primer is an excellent alternative, with low odor and easy cleanup.

Regardless of which type of primer you use, always follow the manufacturer’s instructions for thinning. The can label may say no thinning required, but it’s important to thin the primer with mineral spirits for brushable or sprayable viscosity.

After the primer dries, you can sand it lightly to smooth the surface and eliminate any bumps or uneven textures. If necessary, you can apply a second coat of primer for the perfect finish.

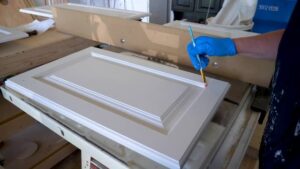
When the final primer dries, it’s time to paint! If you’re not re-staining the cabinet doors or drawer fronts, choose an acrylic latex paint that dries quickly and offers outstanding adhesion. If you’re re-staining the cabinet doors and drawer fronts, you can select an oil-based or shellac-based primer with good durability and stain-blocking qualities.

Stain

Once all of the safety precautions are taken care of, and your work area is prepped for staining, you’re ready to begin. Start by removing all knobs, handles, and hinges from your cabinets. Make sure you mark each one with a letter on painter’s tape so they are easy to reattach when you’re done. This is also a good time to clean your cabinet doors. Make sure to scrape off any food residue, then scrub the surfaces with synthetic steel wool and soapy water. If the cabinets are especially greasy, you can use trisodium phosphate (TSP) to help break up and dissolve grease.

Once the cabinets are clean, you’re ready to sand them down to prepare them for staining. Depending on your preference, you can choose from gel stains, traditional stains, or stain/sealer in-one formulas. Gel stains are a great choice for those who want to go from light to dark and don’t want to undergo the hassle of chemical stripping. However, they still require some light sanding to minimize raising of the grain.

Traditional stains soak deep into wood, highlighting its natural grain and providing rich color tones. This option can be tricky on textured or molded surfaces, though. Before beginning the staining process, sand the cabinets with medium-grit sanding sponges or 180-grit sandpaper on a random orbital sander. This roughing up of the surface will give it “tooth” and improve the adhesion of the new finish.

Before you start applying your stain, make sure to test it on a small area of the cabinet door. This will ensure that the color and consistency of the stain will match your preferences and the condition of the cabinet. Once you’re satisfied with the results, you can move on to the next step.

Before you apply the stain, make sure that your cabinet doors are completely dry from sanding and painting. To speed up this process, you can use a cabinet-safe quick-dry primer. Follow the manufacturer’s instructions for application. After the primer has dried, you can apply a coat of stain. Allow it to penetrate and dry before wiping it off with a soft cloth.

Finish

Cabinet refinishing involves keeping all of the components in your cabinetry, and only changing their color. This can be accomplished by using chemical strippers or lots of hand sanding to remove any existing paint or stain from the wood, then applying new color with a brush or sprayer. Before you can stain your cabinets, they should be sanded and patched with wood filler as needed. You will also want to use an adhesion-promoting primer to create a smooth primed surface.

Choose your stain color from a variety of options, and apply coats to your cabinets, with at least one light sanding between each. It’s best to use a brush for application, but you can also opt to spray. Once the stain has dried, you can reinstall your cabinets.

If you’re not happy with the look of your kitchen, refinishing your cabinets can give you an updated look for a fraction of the cost of replacing them. Plus, refinishing is environmentally friendly, since you’re reducing the amount of wood that ends up in landfills.

On the other hand, refacing is a much more extensive project than refinishing. In addition to removing all of your existing doors and drawer fronts, you’ll need to replace the cabinet hinges, and maybe even the knobs and pulls. This can add up quickly, making refacing a more expensive option.

While refacing can be done by yourself, it’s typically recommended that you work with a professional who is familiar with the process and the tools required. A professional can help you select the right materials for your cabinetry, and also ensure that the job is completed correctly, with minimal mistakes.

Cabinet refacing can also be done by yourself, but you’ll need to purchase a veneer kit, which will include wood veneers and application materials. If you’re refacing your own cabinets, follow the manufacturer’s instructions to attach the veneer panels to the face frames and side panels of your cabinets. Using a utility knife, trim the edges and overhang of the veneer panels to fit perfectly. Then, you can reinstall your new cabinet hardware and enjoy your brand new kitchen!

Add Elegance to Your Home With Custom Drapes

Luxury custom drapes add a sense of elegance to any living space. They also provide a variety of benefits, such as the ability to tie together a color palette. Drapes typically pool a few inches above the floor and can make a room feel larger. They can also include a visible fine or coarse texture to add depth.

Drapes

Custom Drapes Near Me are made to your exact specifications, giving you a high-end look that is difficult to achieve with standard curtains. They also provide added insulation, helping to keep the cold out and the heat in. Custom drapes are available in a variety of styles, from traditional pleated to grommet and panel designs. You can even add lining to prolong the lifespan of your curtains.

If you are looking to create a dramatic statement, consider adding color to your drapes. You can choose from a wide selection of fabrics, including sheers and cottons, as well as velvet and wool textures. The fabric you choose can be complemented with a range of trims and other decorative elements, such as tassels or fringes. You can even use a fabric with a pattern to create a dramatic valance that combines different colors and patterns.

Aside from the style of drape you choose, you can also select the color and lining to match your room’s decor. In addition, you can opt for a valance or header treatment, which adds additional flair to your home’s windows.

The most important aspect of choosing the right custom drapes is the heading style. This choice will have a significant impact on both their aesthetic appeal and functionality. Elaborate pleats such as pinch and euro pleat drapery are apt for more formal and detail-heavy decor styles, while simpler options such as rod pocket and grommet drapes are good choices for design styles that tread the middle ground.

Unlike standard curtains, which come in a limited number of lengths, custom drapes are cut to the exact dimensions of your window. This ensures that they are properly fitted, eliminating the gap between the window and the floor, which can reduce their energy efficiency.

Custom Drapes are also ideal for enhancing the beauty of your window treatments. They are usually longer than conventional curtains, and can make your windows more luxurious and refined. They are a great choice for living rooms, bedrooms, and dining areas.

If you’re not sure what kind of drapes are right for your space, try using a website like Alva that provides a step-by-step guide to designing and ordering custom window treatments. It allows you to view images of real homes to inspire your own design, as well as order swatches of the fabric you’re considering.

They have a visible texture

Custom drapes are a beautiful way to add texture to any room. They’re made to fit your windows and ceiling height, giving them a high-end feel. The drapes themselves can also be tailored with the fabric type, color, and design you choose. Adding drapes can be a great way to add a pop of color and texture in a way that’s subtle and tasteful, and you can even mix pattern with a solid or neutral print.

If you want to use patterned drapes, be sure to stick with the same color palette as the rest of your space. This will ensure that the pattern doesn’t compete with your furniture or other window treatments. For example, in this bedroom from designer Heidi Caillier, the gorgeous Zak+Fox fabric on the drapes blends seamlessly with the wallpaper and bedding. The color palette is also reflected in the drapery hardware, which is an important element when designing a cohesive look.

Drapes are large pieces of thick fabric that hang from a rod above your window. They’re usually used to block sunlight and snooping eyes, but they can be used in any room to add beauty and drama. Luxury custom drapes are available in a variety of colors and designs, ensuring that they match your home’s existing style.

Choosing the right fabric for your custom drapes is important because it will help to create the desired mood and atmosphere of your home. For instance, linen and cotton fabrics are breathable and lightweight, while silk and velvet are luxurious options that add drama and elegance to a room. Moreover, different fabrics can have a noticeable effect on the light in a room.

Another consideration when designing your custom drapes is how they will fall. While traditional drapes tend to hover slightly above the floor, you can also choose to have them puddle on the ground a few inches for a more modern aesthetic. The best way to decide how your custom drapes will look is to explore the many possibilities online, including photo galleries of real client homes and step-by-step tutorial videos.

They help control the light

Often seen in traditional homes, luxury custom drapes are a statement piece that can elevate a space. They add elegance, drama, and eye-catching beauty to any room, but especially bedrooms and living rooms. They’re also a great option for bringing warmth and comfort to a home in winter. They can be paired with a wide variety of other window treatments, including roman shades, roller shades, and cellular shades.

When deciding on the right fabric for your drapes, consider the style of your home. You may want to match the color or pattern of your drapes with the rest of your room’s design, or you might prefer a neutral tone that matches most other colors in your home. There are many ways to customize the look of your custom drapes, such as by choosing the length and type of hems. For instance, you can choose from shirring, pleating, grommets, or double-hemming.

One of the best things about custom drapes is that they are available in a range of sizes to fit any window. In addition, they can be customized to your exact specifications, which means that you’ll get a perfect fit for your windows and a gorgeous aesthetic. Additionally, you can choose from a variety of different textures and materials to create your perfect custom drapes.

Drapes are typically made from thick fabrics that provide excellent insulation and light control. This makes them a more effective insulator than curtains, which are often made from lightweight fabrics that allow air to move through them. Additionally, custom drapes are hemmed with lead drapery weights inside the seams, which helps them stay in place and gives them a luxurious feel.

Compared to curtains, custom drapes are more likely to cover the entire window frame and extend past it, providing better privacy and insulation. They can also be designed to pool on the floor a few inches, which is ideal for creating a more dramatic and formal look. This type of style is popular with design icons like Amber Interiors and Studio McGee, and it can make a room feel taller.

They can protect your furniture

Many homeowners overlook the importance of protecting their furniture from sunlight. Over time, direct exposure to the sun can dull and fade furniture fabrics and even rot wooden furniture pieces. This damage is irreversible, and it can lead to expensive replacements. However, custom drapes and window treatments can help protect furniture by blocking the damaging rays of the sun.

Drapes are crafted from thicker, stiffer fabrics than curtains and often feature linings to prevent light or heat loss. Additionally, they typically come in longer lengths, and can be fitted to the exact dimensions of a window. This makes them a more effective option for reducing air leakage and improving energy efficiency. Additionally, drapes can be hung close to the windowsill or floor to create a tighter air space, which further reduces heat loss.

Aside from adding warmth and visual appeal, luxury custom drapes can also increase privacy by providing a physical barrier between you and your neighbors. This is especially useful in homes with small children, as it will help keep snooping eyes out of your home. The best thing about luxury drapes is that they can be designed to be a combination of both style and functionality, so you don’t have to sacrifice one for the other.

The right fabric is crucial when choosing custom drapes. A good rule of thumb is to choose a fabric that will complement the overall aesthetic of the room, such as a floral print or striped pattern. Additionally, a good quality fabric will be durable and resistant to staining and spills.

You should also consider what size the drapes should be. Ideally, the bottom of the drape should skim the floor or be a few inches above it. This will give the room a more formal look, and it will also reduce the amount of dust that collects on your furnishings.

In order to get the most out of your custom drapes, it is best to have a professional help you with the measurement process. A professional will be able to accurately measure the width and height of your window and recommend the correct size of fabric. Additionally, a professional will be able to show you the different options available for the drapes, including ripple fold, pinch pleat, and tailored pleat.

Protect Your Home From Flood Damage With a Sump Pump

Rain and flooding can wreak havoc on basements, especially those below the water table. A sump pump can help protect your home from flood damage.

The pump works by a float switch that rises with the water level in the pit. This activates an electric motor to power an impeller (fan-like device). The impeller pumps water out of the discharge pipe, which leads away from your house. Contact Sump Pump Aurora CO now!

A float switch is an essential component of a sump pump that triggers it to turn on. It works by measuring the height of the water level in the pump’s basin with a mechanical device. A float switch consists of a hollow body that floats in the water and an internal sensor probe. The float moves up and down with the water, pivoting on a cord attached to the switch that connects it to the pump. The mechanical switch in the float closes when it is in the lowered position, sending an electrical current to the connected pump.

A wide-angle float switch is the most common and requires a significant change in water level, several inches, to trigger on or off. This prevents it from turning on and off rapidly due to minor changes in water level, such as ripples.

Depending on the application, the float switch may use mercury or a mechanical mechanism to open and close contacts. SJE Rhombus offers a variety of float switches to meet the specific needs of your pump or tank application.

While the float switch is an important part of your sump system, it can also be a source of problems. When it is stuck, it can cause your pump to run continuously. This can lead to overheating and shorten the life of your pump. A stuck float switch is often caused by debris, such as hair or food. A blocked discharge line can also keep the float switch from working properly. Check the line regularly to make sure it isn’t clogged or frozen.

If your pump is constantly running, it could be because the float switch has become stuck in the on position. You can try disengaging the switch manually by using a non-conductive item such as a screwdriver or golf club to push it back into its off position. If you can’t fix it, you may need to replace the switch entirely. Before attempting to do this, you should disconnect all the power and water lines, loosen the pipe clamp at the bottom of the discharge line, and remove the old pump from the pit.

Battery Backup

If you live in an area prone to storms or frequent power outages, the addition of a backup battery is an excellent way to protect your home from water damage. This battery will allow your sump pump to function seamlessly without grid power, keeping your basement and your home safe even in the worst-case scenario.

The battery will provide double the power of your sump pump, allowing it to remove excess water quickly and efficiently. This feature is particularly important if your primary sump pump struggles with large amounts of water in heavy rainstorms or flash flooding. It is also a good idea if you live in an area where power outages frequently occur, since they may coincide with severe weather conditions or heavy rainfall, precisely when your sump pump is needed most.

When shopping for a sump pump battery, be sure to select one with a high gallons per hour (GPH) rating. This will ensure that your pump can remove a large amount of water in a short period of time, preventing your basement from becoming too full before the system is able to shut off again. Additionally, be sure to check the battery’s charging capacity regularly and occasionally add distilled water or acid, depending on your specific model.

If you are interested in having a battery backup system installed, contact us today to schedule an evaluation of your property and existing sump pump. We can help you choose the best model to suit your needs and ensure that your basement remains protected in the event of a sudden or prolonged power outage. Even an inch of water can cause significant damage to your home and belongings, making a backup system a wise investment for any homeowner.

Installation

Sump pumps are a common remedy to prevent wet basements, but they’re not the only solution. Your gutters should be in good condition, and the land around your home should be graded to drain water away from the foundation. Additionally, you might want to consider installing battery-powered water alarms that sound when the pump is activated and your home is flooding.

During sump installation, you’ll need to dig a hole for the pit in the lowest part of your basement, preferably near where water and sewer lines enter your home. You’ll also need to locate a GFCI outlet for the pump and run a discharge pipe to a safe location, such as a storm drain or a designated area in your yard.

Before you install your new pump, make sure to check the water level in the basin and that the float on the pump is positioned correctly in the sump pit. It’s important that it rises when the pump is activated and falls back down to keep the water from overflowing the basin.

To install the pump itself, you’ll need to set it in the pit. Make sure that the float isn’t jammed against the bottom of the pit, or it may not raise and fall as needed. If it’s positioned correctly, then you’ll need to connect the discharge line and hook up the electrical connections.

The simplest way to do this is by connecting the discharge pipe to a hose with a small opening that’s outside the pit. You’ll also need to fit a PVC pipe increaser onto the end of the discharge pipe, so you can extend it a few feet away from your home.

Once all of the plumbing connections are made, it’s time to test your new sump pump. Ensure that it’s working properly by dumping water into the pit. If you’re having trouble getting it to work, you can always call a professional for help. The price of hiring a plumber might be worth it for certain installations, such as if you’re using a submersible pump or cutting through a concrete floor to run the pipe.

Maintenance

Performing routine maintenance on your sump pump is essential to keep it working well and prevent costly repairs down the road. This can be done by a professional, or you can take care of it yourself. If you decide to hire a plumber, make sure that they have a good understanding of your sump pump and its operation so that they can properly service it. They should inspect the pit and check to see that it is large enough to accommodate your pump, check the check valve (to ensure it is functioning), and make sure that the battery backup is charged and ready for a power outage.

You should also clean your pump at least twice a year. To do this, you will need to drain your sump and remove the float switch and discharge line for cleaning. Then, use a wire brush to clean the inlet screen and a plumbing snake to clean out your discharge pipe. If the pump has a vent, you should flush this out several times per year to prevent blockage and reduce wear and tear.

If your pump has been in service for a long time, it may be time to replace the battery. This will keep it operating when it is needed most, and it will protect you from water damage in your home.

One of the most common problems with sump pumps is that they fail to turn on when they are needed. This can be caused by a clogged float switch or a faulty pumping mechanism. A plumber will be able to inspect your pump, find the problem, and repair it so that it will work as it should in future storms.

Another common problem with sump pumps is that they leak. Leaking can be caused by cracks, faulty parts, or a loose pipe. A plumber can inspect your sump, find the source of the leak, and take action like tightening valves or patching the hole.

Top Kitchen Remodeling Trends To Transform Your Space In 2024

There are new trends to consider when it comes to Tacoma Kitchen Remodel. Homeowners are prioritizing stylish sanctuaries that integrate functionality with bold color palettes and advanced storage solutions. In addition, more and more homeowners are opting for rounded islands that offer a multi-functional dining or prep space.

For flooring, designers are recommending checkerboard tiling to add visual interest and a classic aesthetic. Eco-friendly materials are also gaining traction for backsplashes and countertops.

kitchen remodel

Personalized Spaces

In a time when personalization is key, homeowners are prioritizing stylish sanctuaries that fuse functionality with bold color schemes, advanced storage solutions, and smart appliance integration. Whether it’s a bold color palette or rustic materials, kitchen trends of 2024 offer endless opportunities to craft a space that feels like home.

A growing trend in kitchen remodeling is the shift towards open-concept spaces that blur the lines between cooking areas and casual dining rooms. This trend allows for enhanced sociability and seamless transitions between activities while providing ample room for multifunctional furniture and appliances that serve a range of functions beyond food preparation.

In addition, homeowners are reimagining pantries as functional and stylish extensions of the kitchen. This new design approach features open shelving and glass doors that showcase the pantry’s contents and add visual interest to the space. This trend also helps to streamline the kitchen’s layout and improve overall accessibility, ensuring that all items are readily available when needed.

Bold colors are moving beyond neutral tones in kitchens, with rich greens and deep blues making their way into cabinetry, backsplashes, and accent pieces. This dramatic trend offers a fresh take on traditional kitchen designs and can instantly transform a space into an inviting ambiance.

Another way to personalize your kitchen is by incorporating rustic materials like wood tones, stone, and natural textures. These earthy elements create a warm, inviting atmosphere and can be complemented with a variety of different finishes. Mixed metals are also a popular choice in kitchens, allowing you to experiment with multiple style combinations.

Finally, wallpapers are a great way to inject your personality into the kitchen. From floral patterns to geometric prints, there are many options to choose from that can instantly transform your kitchen into a visually appealing focal point.

As a final note, be sure to consult with a qualified professional when planning your kitchen remodel. A reputable design-build firm will be able to help you translate the latest trends into a custom design that fits your unique needs and style. Whether you’re drawn to smart technology, soothing colors, or textured wallpapers, a high-quality firm can help you craft a personalized space that will last for years to come.

Stylish Storage Spaces

As kitchen trends continue to evolve, homeowners want functional, beautiful storage spaces that are tailored to their specific lifestyles. In 2024, designers are noticing that clients prioritize a sense of warmth and natural, organic elements in their space while maintaining a clean design. From bold backsplashes and eye-catching cabinetry to textured materials and more, these top kitchen remodeling ideas are sure to transform your space in the new year.

While white-on-white kitchens are slowly fading away, interior designers are embracing warm neutrals and incorporating a variety of textures to add visual interest to the space. The trend toward embracing natural, organic elements is also being seen in kitchens with wood accents and cabinets that are stained or painted in earthy hues.

The kitchen island is becoming a central gathering point for family and friends, as well as a place where people can eat, drink, and work together. As such, clients are requesting island layouts that offer more seating and functionality, such as built-in benches or additional workspaces. They’re also asking for integrated appliances, more comfortable counter stools, and even a hidden wine bar.

Instead of focusing on hiding all clutter away in the cabinets, designers are transforming nooks and alcoves into stylish storage solutions. “Narrow shelves are a great way to keep everyday items out of sight and at arm’s reach, but still readily available,” says a designer. “They are a great addition to any kitchen and are particularly effective in breakfast areas.”

If you have the space, adding a butler’s pantry is a luxury that’s a must-have for homeowners who enjoy entertaining. This functional space can be used to store and display a variety of items, from pretty jars and vases to fresh produce and herbs. It’s also the perfect spot to set out wine or coffee cups for guests.

If you’re looking to make your home feel more like a retreat from the busy world outside, consider incorporating a dedicated wellness area in your kitchen. This could include a water filtration system and even space for growing your veggies and herbs to support your healthy lifestyle goals.

Statement Lighting

Whether you’re doing a complete kitchen remodel or simply sprucing up your cooking space, you can add a bold statement to your space with the right lighting. From recessed to sconces and pendants, well-curated lighting can transform your kitchen. Layering tasks and ambient lighting is a great way to create a unique kitchen look that’s on trend in 2024.

Kitchen design trends in 2024 are moving away from stark minimalism and embracing natural, organic elements for a balanced and soothing look. This means incorporating more wood, stone, and greenery into your kitchen design. The top trends we’re seeing also include eliminating upper cabinetry to maximize windows and incorporating a blend of both modern and traditional design aesthetics.

Backsplashes are becoming even more eye-catching and a kitchen statement piece, with designers noticing an uptick in backsplashes that feature bold colors or unique patterns. Tile company founders say they’re noticing an increase in requests for backsplashes that incorporate a mix of organic shapes and textures to create a layered design.

Slab backsplashes offer a stunning continuity from countertops to walls, and they can feature gorgeous marble-looking material that features bold veining. They’re a head-turning way to tie your countertops and backsplash together, and they’re one of the best kitchen remodeling trends in 2024.

Oversized islands are another trend that’s gaining traction in the kitchen. They allow for plenty of workspace and can be used as a focal point for your cooking space. Kitchen islands can be a great place to incorporate one of the top kitchen trends in 2024, a waterfall countertop that ties your countertops and backsplash together for a stunning look.

The key to incorporating kitchen trends is ensuring they’re timeless and blend in with the rest of your home’s architecture. Designers are noticing more requests for a seamless transition between the kitchen and adjacent spaces, including creating dedicated beverage centers to make entertaining easier.

Integrated Appliances

Integrated appliances are a sleek, minimalist style that works well with many kitchen designs. By concealing refrigerators, range hoods, and dishwashers behind cabinetry panels, these appliances create a streamlined aesthetic that maximizes space. In addition, they make it easier to keep kitchen surfaces clean and organized. Integrated appliances are also available with user-friendly interfaces, such as touchscreens or voice-controlled systems. This makes it easy to control and monitor your kitchen’s functions from any location.

While integrated appliances are a great option for homeowners looking to improve their home’s visual appeal, they may not be ideal for everyone. Integrated appliances are not removable, so they cannot be taken with you if you decide to move. Additionally, they can be more expensive than freestanding appliances. However, if you’re committed to the minimalist look or prefer a more traditional Shaker-style design, integrated appliances may be right for you.

Another popular kitchen trend in 2024 is the use of natural stone countertops. Granite, marble, and quartz remain a popular choice for their durability and timeless beauty. They offer a variety of colors and veining patterns to match any style and add a luxurious touch to your kitchen. In addition, natural stone countertops are easy to clean and can resist stains, scratches, and heat.

With so many kitchen trends to choose from, it’s important to take the time to think about your needs and preferences before making a final decision. By taking the time to select a design that aligns with your style, you’ll be more likely to enjoy your new kitchen for years to come.

In addition to incorporating modern technology, designers are integrating wood and metal details into the actual cabinetry. Whether it’s a waterfall edge or a cantilevered countertop, these design elements add an elegant, sophisticated feel to the kitchen. In addition, designers are experimenting with the use of glass in the cabinetry, allowing light to filter through and enhance the overall aesthetic.

With the right team, you can achieve the kitchen of your dreams. The experienced professionals can help you find the perfect design for your home and implement the latest innovations that will elevate your culinary experience. Contact us today to start your journey toward a more beautiful and functional kitchen.